Showing posts with label SQL Server. Show all posts

Thursday, February 4, 2016

Edition Upgrade in SQL Server

Hi Friends,

Check here for my last post of year 2015 on Hadoop. By this, lets start with this post on "How to perform in-place Edition upgrade". This procedure will work well with SQL Server 2005 and above.

Requirement:

There was a requirement from the client to upgrade the Edition from Enterprise to Standard for one of my SQL Server 2008 R2 instance.

So lets see how simple and time efficient is the in place upgradation:

Step 1: Launch the SQL Server setup file => Go to "Maintenance" tab on left hand side.


Step 2: Click "Edition Upgrade" link on Right hand side. This will check first check the rules.


(Next)


(Next)


Step 3: Very important step check the new edition here (Which I have highlighted below)


Step 4: Select the instance from the drop down for which the instance need to be upgraded.


(Next)


(Next)


Hold on for 3 Minitues and your in place edition upgradation is finished.

As you have seen how simple and time efficient it is to perform this, it comes with the cost. AND the cost is "if there is any error during the upgradation phase there is no procedure to rollback".

The only option left with us is complete uninstalltion and again installing the fresh setup. So before starting this procedure make sure you have taken the necessary precaution.

Have your ever faced this error.


Thursday, January 21, 2016

Error - Instant File Initialization Failed

Hi Friends,

Here comes the first post of the wonderful year 2016 ahead. Last year, we have ended with the post on Introduction to Hadoop. Lets start our first post with an Error in SQL Server.

Description:

One of the error which I faced very frequently now a days as you can see the below snapshot: "File initialization failed" because of which my Restoration activity was failed.

This error occurred when I was in the middle of a Migration activity, were I was suppose to Backup and Restore a Database from one Server to another one. After executing the Restoration command with stats=1, I was waiting for 1 percent to complete (after that I can have a nap because the backup file was huge and the activity was at mid night) but I was awaiting awaiting and awaiting for that 1 percent. It was getting suspicious because it should not take too long to complete even a percent.

So, I decided to stop the restoration. Once the session was stopped I found the below error message:

Instant File Initialization Failed

Instant File Initialization Failed
Basically, I will try to explain the behind the scene what exactly SQL Server does then we create or Restore a backup file in different post. In this post just lets look for the solution for the error.

Solution:

1. Run => Secpol.msc;

Open Local Security Policy => Local Policies => User Rights Assignment => "Perform Volume Maintenance Task" => Right click => Add the user through which SQL Server services are running. Like you see in the below snapshot.

2. No need to restart the Server.

3. Now, start the restoration process and this time it will work well.

Perform Volume Maintenance Task

Perform Volume Maintenance Task

So from now SQL Server will skip the Zero Initialization whenever we create or restore a Database. Later we will see what exactly does this mean in probably in different post.

Hope this will save your time and this will help you. Don't forget to drop a comment below. Also do vote below if it is Interesting, Informative or Boring.

Facing trouble while switching the Database from Single User Mode to Multi Mode check here for solution.

(It's been so long, more than couple of weeks I was away from my blog. I'm afraid this could further continue for few more, due to multiple projects on weekdays as well over the weekends. Due to this, my Blogging might also affected. So, stay tuned soon we will learn many things on SQL Server as well as Hadoop Administrator.)

Thanks,
Vikas B Sahu
Keep Learning and Enjoy Learning!!!

Monday, November 2, 2015

Error - While Putting Database from Single to Multi User Mode

Dear Friends,

Click here to check how to start the SQL Server without TempDB Database. Let's learn what to do or how simple it can be to change the Database Mode from Multi User to Single User Mode or vice-versa?

Indeed! it is simple with the following command:

a. Alter Database Out set Single_User 
b. Alter Database Out set Multi_User

If we don't mention any termination clause like above it will run until the statements get completed.

Suppose there are n numbers of users connected to the Database and you executed the above command it will take hell lot of time to complete.
So rather, you can force disconnect the users to put the Database in Single User mode you have to fire the below command:

Alter Database out set Single_user with Rollback After 30 -- After 30 Seconds it will cancel and Rollback the Query

Alter Database out set Single_user with Rollback  Immediate -- It will immediately cancel and Rollback the Query

Alter Database out set Single_user with No_Wait -- If  there is any incomplete transaction No_Wait will Error

But again it might get horror if the Databases is in Single User and you cannot access the Database because only one connection can be made at a time and just think that connection is taken by the system i.e. SQL Server.

In this situation you are locked out, reason you cannot access the Database. Like you can see in the snapshot the Database Out is used by the system i.e. it is used by the Background process.

If you try to bring back the Database again in Multi User mode system will throw the following error:


Another possibility you can try would be detaching the Database. But when I tried detaching the Database, SQL Server will first kill the connections to the Database. Rather I should frame it as SQL Server will kill only the User connect and not the system connection.

After loads of struggle we were back to square one, that our Database was not getting back to Multi User mode. Seems it was like a deadlock between System SPID with Out Database. So we enabled the trace flag and checked the Error Log file. So following snapshot confirms that there was an deadlock:

DBCC TRACEON (1204,1222,-1)

Deadlock Graph
Deadlock Graph
If we try to Alter the Database to put it in Multi User mode. We will get a deadlock and since our Alter Statement is having low priority it will fail with the error message:


After random tries we tried the following command and it saved us. We have to set the deadlock priority high and then execute the Multi User mode query like below:

Set Deadlock_Priority High
Go
Alter Database Out Set Multi_User

So what this will do is it will set the Dead Lock priority High and Alter the Database to Multi User mode.

Guys do share the feedback about this article and of course about the blog too.

Want to start learning SQL Server Clustering?? Check here the three part series on SQL Server Clustering.

Do you know MS SQL Server 2016 is ready to launch?? Check here the two part series on New Features of SQL Server 2016.

Keep Learning and Enjoy Learning!!!

Tuesday, October 20, 2015

Error 233 - No process is on the other end of the pipe

Hi Guys,

As we have seen here an error related to SQL Server Restart. Today we will see another error i.e. Error 233 "A connection was successfully established with the server, but then an error occurred during the login process."

You might have faced this common issue in your DBA career and yes the solution is relatively simple.

So what I was doing, I was connecting to the SQL Server from Windows Login but during the login process it failed and prompted the below error message:

Error 233 in SQL Server
As I said this seems an common problem so there might be multiple workaround for this.

Now, for me the solution was to start the SQL Server management Studio (SSMS) under "Run as Administrator" (When I was fresher, I use to always wonder what difference it makes if I start any program under Run as Administrator?? Let's find out the reason for that).

Reason for this error was:

a. When we are running an application under "Run As Administrator" we get extra privileges which we may not have under the local user account.

b. So running the program under Run As Administrator will grant extra rights to the account (but it should have admin rights in Active Directory).

Once I started the SSMS under Run as Administrator and connected to SQL Server it succeeded.

There might be chances that this may not solve this  issue, check here to find more work around on the issue.

Do you know?? We should properly set the Auto Growth parameter in Database else it would end up with consuming extra space. Check here.

Thanks,
Vikas B Sahu

Keep Learning and Enjoy Learning!!!

Thursday, October 8, 2015

How to Start SQL Server Instance when TempDB is unavaliable

Hi Guys,

Here is my last post on error while starting the SQL Server Analysis Services (SSAS) and here I've shared earlier on a issue, I request you please read that before proceeding.

Today we will learn a fact on the internal of SQL Server Tempdb (which was little unusual for me before I actually faced it. So I must say it was a learning experience).

Following are some questions that comes to my mind when I think about TempDB:

1. Where and how exactly the TempDB Database is used?

2. What exactly happened when your TempDB is corrupted?

3. Have you ever though of restarting the SQL Server Services without TempDB? Is it possible to do that?

4. Is it possible to Backups (Full, Differential or Log) and Restore the TempDB Database?

Let's see the possible answers to these questions:

Q 1. Where and how exactly the TempDB Database is used?

Ans. i. It is a System Database. Database ID for TempDB is 4. 
        ii. It is use to store temporary Data. Whenever we create a hash table (#abc) it gets created in TempDB.  
        iii. It also used for Sorting of Data (for e.g. If we use Order by clause in a query it uses TempDB to sort).
        iv. Also used for Row-Versioning.
        v. Recovery model of the TempDB is "Simple". 
        vi. We cannot run DBCC CheckDB on TempDB. 
        vii. We cannot detach the TempDB files. (Rather I must say one cannot detach the system Database files) 
        viii. Most important it is re-created every time whenever SQL Server is restarted. By checking the "Last Creation Date" we can see when was the last SQL Server was restarted (can expect as an interview question).

2. What exactly happened when your TempDB is corrupted?

Ans. i. Since we cannot run DBCC CheckDB; we cannot identify if there is any corruption on TempDB Database.
        ii. The only way to get rid of  corruption is to restart the SQL Server Services. Since it will recreate the Database files again.
        iii. Without TempDB Database SQL Server Services cannot be started. 
        iv. Model Database acts as the template for all the user created Database as well as for TempDB. So if model Database is unavailable TempDB will not get create and hence SQL Server  Service cannot be started.


TempDB Cycle
TempDB Cycle

3. Is it possible to Backups (Full, Differential or Log) and Restore the TempDB Database?

Ans. i. Since TempDB is recreated every time when ever we restart the instance. We cannot Backup this Database.

4. Have you ever though of restarting the SQL Server Services without TempDB? Is it possible to do that?

Ans. (Now here is the question what made to write this post)

i. As said above, TempDB is restarted every time when a SQL Server is restarted. (This will create both the mdf and ldf files on the location present for TempDB in the Master Database). 

ii. But what if there is a disk level corruption or the defined location is not present due to xyz reason.

iii. Now here comes my question: Will the SQL Server Services will start??? So, answer for this is YES!!! it is possible (Till now it was NO for me). 

iv. If  you will start the SQL Services normally (assuming there is a disk level corruption on the disk were the TempDB was placed) the disk is unavailable you will get the below error message:


TempDB Error Log
TempDB Error Log
v. So basically starting the SQL Services normally will not help you. Therefore we have to start the SQL Server Instance in Single User Mode as well as Minimally Configured. 

Startup Parameter
Adding Parameter in Startup parameter
vi. You can do that by adding -m (Single User Mode) and -f (Minimal Configuration) parameter in the startup parameter in the SQL Server Instance.

vii. This will start your SQL Server in minimal configuration (of course TempDB files is created) placing the TempDB files i.e. Data file on the User Database Data file location and the Log file on the User Log file location.

viii. And by this way your TempDB files are placed on different location other than the actual location for TempDB files.

ix. But this different location is temporary and only if you will start your SQL Server Instance in minimal configuration. So it is important to change the TempDB location to another drive by using the following command:


USE master;
GO
ALTER DATABASE tempdb
MODIFY FILE
(NAME = tempdev, FILENAME = 'C:\Program Files\Microsoft SQL Server\MSSQL10_50.SQL2008R2\MSSQL\DATA\TEMPDB\Tempdb.mdf');
GO
ALTER DATABASE tempdb
MODIFY FILE
(NAME = templog, FILENAME = 'C:\Program Files\Microsoft SQL Server\MSSQL10_50.SQL2008R2\MSSQL\DATA\TEMPDB\Tempdb.ldf');
GO

SELECT name, physical_name AS Location
FROM sys.master_files
WHERE database_id = DB_ID(N'tempdb');
GO

Hope this post will give you a different angle on concept of TempDB. Further we will see so more findings on TempDB. Share your comment on this to discuss more on it. You might be aware on SQL Server 2016 check here for the new features in it.

Thank You !!!

Wednesday, October 7, 2015

Error - Analysis Services Failed To Start in SQL Server 2012

Hi Guys,

Read my last blog on Error while configuring SQL Server Cluster here. As a DBA, we cannot or say we should not limit our self to only Database Engine related stuff. Today let's learn something related to Analysis Service i.e. SSAS.

In one of the migration project, I wanted to migrate an SSAS Database which is called as "Cube" to another Server.

So firstly, I needed the backup of the Cube. See the following command to take the backup of the Cube.
SSAS Cube Backup Code
Where Test is the Database Name and Test.abf is the Backup Name (Which will take the Backup in the default location).

Now, I wanted to restore this backup to my new Server. But when I tried to connect the SSAS, it got  failed due to SSAS was disabled. So tried to start the SSAS and it gave the following error:

SQL Server Analysis Services Stopped

And when I checked Windows Event Viewer it captured the below error message:

Windows Event Viewer Error
Windows Event Viewer
From the Error in the Event Viewer it is confirmed that it is related to something with permission issue. So what we commonly do is "Going to that particular drive\ Folder and give full right to the account which runs the SQL Server Analysis Services". But unfortunately it din't helped.

I started searching more in google related to this error and in most of the sites they will provide the same solution which we saw above. And the search continued and continued till I landed to the next solution. And solution was to check the msmdsrv.ini file (It is an Configuration file for AS).

Basically when we configure AS, we have to pass a location where Data and Log file will create, but in my case no such files where created. So what did was as follows:

1. Created two Folder's Data & Log on E:\ and F:\ drive respectively and gave full permission to it.

2. Open the msmdsrc.ini file (in notepad) from this location (default):

C:\Program Files\Microsoft SQL Server\MSAS11.MSSQLSERVER\OLAP\Config

msmdsrv.ini
msmdsrv.ini File
3. As we can see DataDir and LogDir tags which contains the location for the files; Change the path save it.

4. Then tried to re-start the AS and it was successfully started.

So the resolution for this seems simple. Want to know what is SQL Server Azure read my introduction post on Azure. Do comment if you like of dislike the page.

Thank You !!!
Keep Learning and Enjoy Learning !!!

Monday, October 5, 2015

SQL Server 2012 Clustering Errors

Hey Friends,

So till now we have seen the installation and configuration of SQL Server 2012 Clustering in our three part series as Part 1, Part 2 and Part 3 of SQL Server 2012 Clustering.


Now let us see few errors which I have faced during the Installation and Configuration of SQL Server 2012 Clustering:

1. Error: Cluster Service verification Failed
    Description: During one of the Server Migration i.e. Windows Server 2012 and SQL Server 2008       R2

Add a failover Cluster Node
Error-1
Solution: The solution was basically we have run the below command from the power shell:

Install-WindowsFeature -Name RSAT-Clustering-AutomationServer

Basically MsClus.dll library is by default disabled in Windows Server 2012. So by running the above command it enables it which is require for installation of SQL Server 2008 R2 Cluster.

I've got the solution of this from this msdn link.

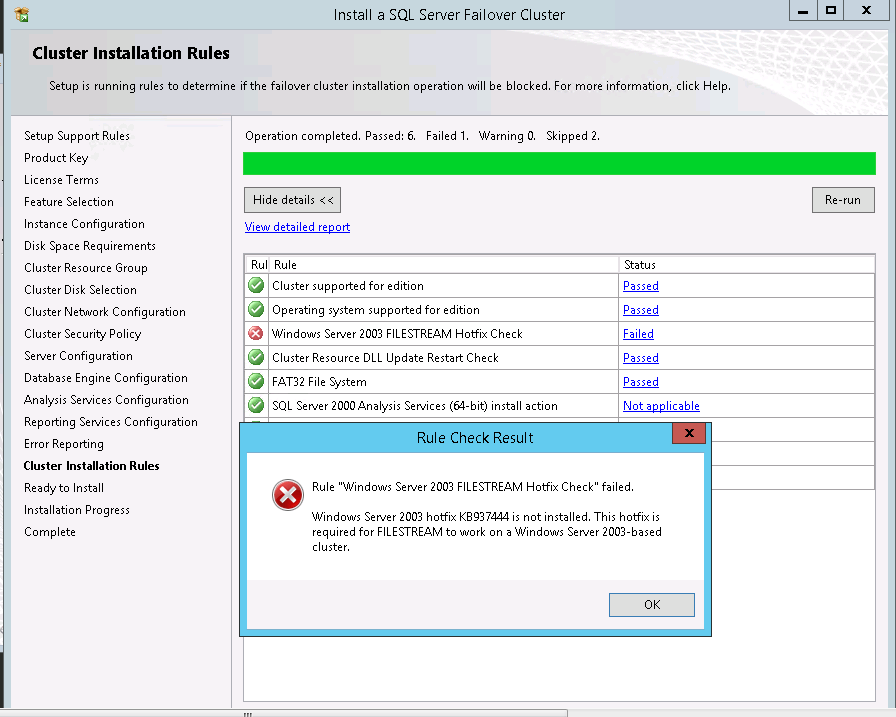
2. Error: Cluster Service verification Failed
    Description: During one of the Server Migration i.e. Windows Server 2012 and SQL Server 2008       R2

Install a SQL Server Failover Cluster

Solution: 

Follow the below steps:

Copy  C:\Windows\Cluster\Clusres.dll TO C:\Windows\system32 and rename the file to W03a2409.dll

For this error, if you will search in internet you might get multiple solutions. I found this solution is the shortest and best way to resolve the error.

I've got the solution of this from this Microsoft link.

Keep Learning and Happy Learning!!!

Monday, September 14, 2015

SQL Server 2012 Clustering - Part 3

Hi Guys,

As we have seen my previous posts on how to configure the Windows Clustering and Setup the Quorum, now we will move forwards towards the final step to configure the SQL Server Cluster.

Installing and Configuring SQL Server Cluster is very much similar to installing a SQL Stand alone Server. Here, we will install and configure a two node Active - Passive Cluster and will see only the different pages occur while Installing and Configuring the SQL Server Clustering rest pages remains the same.

Let's start with the installation of SQL Server Cluster on Active Server. Following are snapshots for it:

1. Start the installation and Click "Installation" link on left hand side of the page. And then start the installation with "New SQL Server Failover Cluster Installation".


2. After couple of Next and Next's you will land to "Instance Configuration" page. Now here you have to Enter the "SQL Server Network Name" and the "Instance Name" (For named instance)

For Eg. If you enter here the Network Name  as "SQLServer_01" and Instance Name as "SQL01". Then the Server Name in the connectivity will be "SQLServer_01\SQL01".


3. Again after few Next's you will land to "Cluster Resource Group" page, were you have to enter a Unique name as a Cluster Resource Group Name. This will help in case there are multiple Cluster configuration.


4. Here we have to check all the Disks which you want to bring under that Cluster Group.


5. Enter an "Unique IP address" in the Address box after un-checking the DHCP.


6. So by now your SQL Server Cluster is installed on the Active Node. Now, you have to start Adding node on the Passive instance. As you can see the snapshot you have to start the installation and Click "Installation" link on left hand side of the page. But this time choosing "Add node to a SQL Server Failover Cluster".


Rest of the process are simple. So now the SQL Server Cluster is ready to deploy your Database.

Click here to refer Part 1 and Part 2 of this topic.

We will discuss the Errors while configuring the SQL Server Clustering in different post. So stay tuned.

Till then Keep Learning and Enjoy Learning!!!

Tuesday, September 8, 2015

Error 1807 - Database creation failed


Hi Friends,

While creating a Database an Error 1807 occurred as you can see the following snapshot.

Basically the create database failed due to an exclusive lock cannot be obtained on "Model" Database. 

Error 1807 - Database creation failed
Error 1807 - Database Creation Failed

Run the below set of queries to find out were exactly is Model Database is on use:

Use master
  GO
  IF EXISTS(SELECT request_session_id  FROM sys.dm_tran_locks
  WHERE resource_database_id = DB_ID('Model'))
   PRINT 'Model Database being used by some other session'
  ELSE
   PRINT 'Model Database not used by other session'


  SELECT request_session_id  FROM sys.dm_tran_locks
  WHERE resource_database_id = DB_ID('Model')


DBCC InputBuffer(52)

Kill the SPID and re-run the create database syntax. This time you will create a Database without any error.

Check out the error here while executing the Extended Stored Procedure.

Keep Learning and Enjoy Learning!!!

SQL Edition Upgrade Architecture Mismatch

Hi Friends,

I have recently posted an article on how to configure Quorum which was Part 2 post of three part series of SQL Server Clustering.

Recently I was checking my old mails and from that I found an error which we have faced a year back. So though of sharing with you guys. As my headline states "SQL Edition Upgrade Architecture Mismatch", yes it some what belongs to Edition Upgradation error.

Following is the snapshot of the error:

SQL Edition Upgrade Architecture Mismatch
Error - SQL Edition Upgrade Architecture Mismatch
Generally we do get this error on the landing page itself during the verification step if SQL Server found there is mismatch in the Bits i.e. x86 or x64 Bit. So the solution for this is very much simple.

Go to the Option tab on the left hand side in the initial page. Now you can see there are two radio buttons x86 and x64. By default its x64. You can change this as per your requirement.

You can see the following snapshot for reference:


After changing it you can proceed with the installation part.

If anyone of you planning for SQL Server Certification refer this post, it will give you an overview on the examination. Also you can comment on it if you have any.

Keep Learning and Enjoy Learning!!!

Monday, September 7, 2015

SQL Server 2012 Clustering - Part 2

Dear Friends,

As you have seen how to configure Windows Clustering, now let's proceed to the next step of SQL Server 2012 Clustering which is Configuration of Quorum.

For configuration of Quorum following are the two approaches:

Method 1: Failover Cluster Manager GUI

Method 2: Windows Power Shell

Let's have a look how to configure Quorum by these two method:

Method 1: Through Failover Cluster Manager GUI

Below are the snapshot with description for the configuration of Quorum:

1. Open the FOCM (Failover Cluster Manager). Towards the extreme right you can see "More Actions" Click that then click "Configure Cluster Quorum Settings...". You can see these steps in the below snapshot.


2. Once you are in the page of cluster configuration you can refer the below snapshot in clockwise direction.

i. Check the radio button "Select the Quorum Witness".
ii. Next check "Configure a file share witness".
iii. Pass the location (path name), here it will create the binary for Quorum.
iv. Click next and check all the settings which you have configured.


3. Click Finish and view the report. You have successfully configured the Quorum.


Method 2: Through Windows Power Shell

Configuring Quorum through Windows Power Shell is simple. The only thing we need to run is a one liner command as you can see in the below snapshot.


  • Open Windows Power Shell from the Task bar or open run and type "powershell".
  • Run the below command:
  • Set-ClusterQuorum -NodeAndFileShareMajority \\abc\sqlserver\

Till now we have seen how to Configure Windows Cluster and Configuration of Quorum. So both these are the pre requisite for configuration of SQL Server Cluster as well as SQL Server AlwaysON. In the Part 3 of the post we will see how to configure SQL Server Cluster.

Refer to the link of msdn here for more knowledge on Quorum setting.

Click here to refer Part 1 and Part 3 of this topic.

Thank you guys for reading the post, click here to read my first post on this blog. Do comment on the post.

Keep Learning and Happy Learning!!!

Friday, September 4, 2015

Dropping a SQL Server Database

Hi Guys,

Last post I have shared an Error that I was unable to start my SQL Server Database Engine. Today here I will share a small finding which I thought of worth sharing it.

In one of my migration project what I observed was "Even after dropping a Database the Data files and Log files were still exist". Ideally this should not happen because if we drop a Database the data file and log file associated with it should be dropped as well. But lets see what happened exactly that the database files are not dropped.

So what are the reasons for this?

Following are various ways to remove or Offline the Database from the SQL Server Database Engine:

a. Drop a Database
b. Detach \ Attach
c. Offline \ Online

General syntax for dropping a Database is: Drop Database Test

Let's see the scenario what exactly happened:

For the production migration what we were suppose to do was, remove then Test migrated Database and the replace it with the new Production migration Database. Following is the sequence which I followed:

Current Production Server : SQLServer-Current
New Production Server : SQLServer-New
Database Name : Test
  1. The test migration for the Database "Test" was done on "SQLServer-New" from "SQLServer-Current" Server.
  2. After proper testing on "SQLServer-New" the Databases was put Offline.
  3. On the day of actual Production Migration, we dropped the database so that we can create a fresh copy of the Database.
  4. Once it was dropped we started restoring the Database on the location were we have kept the data and log file.
  5. It popped out an error message that the mdf and ldf files are exist. Either I should rename by new file name or I need to change  the path.
  6. Since I cannot change the Database path, I was forced to change the file names.
  7. After that I was able to restore the Database.
  8. But I was wondering how can the files are still exist if I have dropped the Database. So once the migration activity was completed successfully I started troubleshooting it and here I found something new to learn.
"If you put the Database in Offline state and then drop a Database; you will always find the file associated with the Database present in the defined location"

Share you comments or any queries below to discuss more.

Wednesday, August 12, 2015

SQL Server 2012 Clustering - Part 1

Dear Friends,

Recently I've configured Clustering as a Disaster Recovery (DR) and High Availability (HA) solution for one of my project. You might find many blogs on this topic explaining the concept and how to configure SQL Clustering.

Here I will try to explain the same in my terms and keep it as much as simple. And yes it will be from starch i.e. We will first see the how to configure Windows Cluster and then on top of it will configure SQL Server Clustering. It will be a multi part series.

Brief on Clustering:  

Cluster can be defined as when two independent machine come into existence with each other by sharing the disks in common. This is done because, just in case of any disaster on physical machine, it will automatically failover the disks to another machine as the disks are shared between the Servers. This will recover the Database in disaster. So this solution can be used as Disaster Recovery (DR) solution along with High Availability (HA).

I. Step for configuration of Windows Clustering Using GUI:

1. To start with the Windows Clustering; it is mandatory to have the Shared Storage between the Servers (which should be setup by the SAN Administrator).
To verify these disks open Server Manager and verify if the Shared Disks are visible on both the Servers like you can see in the below snapshot.

Server Manager GUI
Server Manager GUI


 2. Now we have to add "Failover Cluster" Roles on the Server. Open "Server Manager" then click "Add Roles And Feature".

Below snapshot means:

   i. Select Roles-based option.
   ii. Select the appropriate Server name.
   iii. Click Next
   iv. Check "Failover Cluster"
    v. Click "Add Feature" then click install


3. Once the roles is added, go to Service manager and then, Tools and then, Failover Cluster Manager. Open Failover Cluster Manager GUI.


4. As shown in the below snapshot, Go to extreme Right and click Validate Configuration.


5. Validate Configuration step will basically check Storage, Network, etc. One need to check the recommended setting and validate the configuration.
The Disk will go offline and come back online; if Disk Validation is checked. (Disk validation is basically unchecked when the Cluster is in production.)

Below snapshot means:

   i. Enter the both the Server Names.
   ii. Run the recommended setting.
   iii. You can view the progress
   iv. View the error if any or click finish.


6. Once it is successfully validated, you need to mention a Windows Cluster Name and an IP Address for that Windows Cluster as you can see in the below snapshot. Once you have successfully completed click Finish.


You can cross verify by cmd command and ping the Windows Cluster name or the IP Address provided above in point 5.

II. Step for configuration of Windows Clustering Using Power Shell:

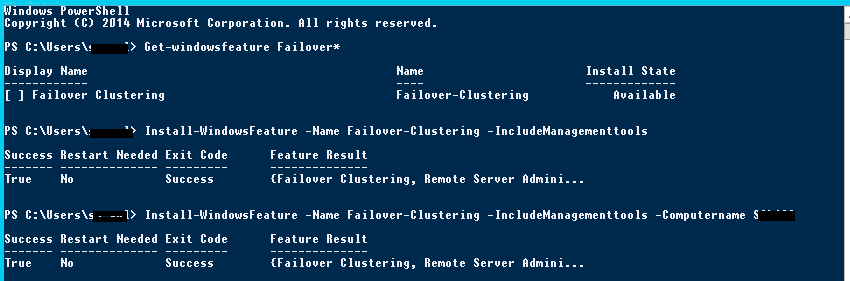
1. We need to first install the Cluster Failover Management Tools:

Following commands can be run from the Power Shell:

a. Get-WindowsFeature Failover*

b. Install-WindowsFeature -Name Failover-Clustering -IncludeManagementTools --This command will install the Windows Feature Failover tools on the local Server but if you want to install the same on remote Server as well we have to run the following command:

c. Install-WindowsFeature -Name Failover-Clustering -IncludeManagementTools -ComputerName XYZ


2. Till now you have installed Failover feature on the Servers, next you have to configure Windows Cluster on these Servers:

Following commands can be run from the Power Shell:

d. New-Cluster -name SQL_Cluster -Node ABC, XYZ -StaticAddress xxx.xx.xx.xxx


where SQL_Cluster is Windows Cluster Name
ABC and XYZ are the Server Names between which Cluster needs to be installed
xxx.xx.xx.xxx  is the static IP Address for Windows Cluster.

So you have seen how simple is to build Windows Clustering through GUI as well as Poser Shell. This is not just limited as a pre- requisite to SQL Server Clustering but also for Configuring AlwaysON.

Here's the end of Part 1 of SQL Server 2012 Clustering. We have seen how to configure the Windows Server Clustering which is the first step towards configuring SQL Server Clustering.

Now next will be configuring the Quorum for the Cluster.

Click here to refer Part 2 and Part 3 of this topic.

Thank you for reading this post. So stay tuned and share your comments too.

Keep Learning and Happy Learning!!!