Showing posts with label SQL Server Clustering. Show all posts

Monday, October 5, 2015

SQL Server 2012 Clustering Errors

Hey Friends,

So till now we have seen the installation and configuration of SQL Server 2012 Clustering in our three part series as Part 1, Part 2 and Part 3 of SQL Server 2012 Clustering.


Now let us see few errors which I have faced during the Installation and Configuration of SQL Server 2012 Clustering:

1. Error: Cluster Service verification Failed
    Description: During one of the Server Migration i.e. Windows Server 2012 and SQL Server 2008       R2

Add a failover Cluster Node
Error-1
Solution: The solution was basically we have run the below command from the power shell:

Install-WindowsFeature -Name RSAT-Clustering-AutomationServer

Basically MsClus.dll library is by default disabled in Windows Server 2012. So by running the above command it enables it which is require for installation of SQL Server 2008 R2 Cluster.

I've got the solution of this from this msdn link.

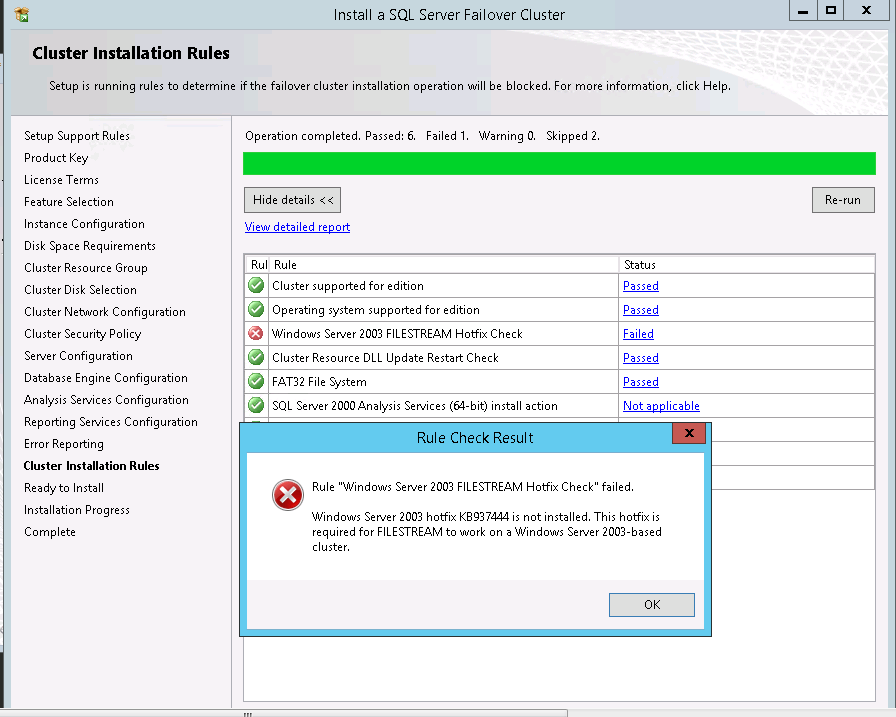
2. Error: Cluster Service verification Failed
    Description: During one of the Server Migration i.e. Windows Server 2012 and SQL Server 2008       R2

Install a SQL Server Failover Cluster

Solution: 

Follow the below steps:

Copy  C:\Windows\Cluster\Clusres.dll TO C:\Windows\system32 and rename the file to W03a2409.dll

For this error, if you will search in internet you might get multiple solutions. I found this solution is the shortest and best way to resolve the error.

I've got the solution of this from this Microsoft link.

Keep Learning and Happy Learning!!!

Monday, September 14, 2015

SQL Server 2012 Clustering - Part 3

Hi Guys,

As we have seen my previous posts on how to configure the Windows Clustering and Setup the Quorum, now we will move forwards towards the final step to configure the SQL Server Cluster.

Installing and Configuring SQL Server Cluster is very much similar to installing a SQL Stand alone Server. Here, we will install and configure a two node Active - Passive Cluster and will see only the different pages occur while Installing and Configuring the SQL Server Clustering rest pages remains the same.

Let's start with the installation of SQL Server Cluster on Active Server. Following are snapshots for it:

1. Start the installation and Click "Installation" link on left hand side of the page. And then start the installation with "New SQL Server Failover Cluster Installation".


2. After couple of Next and Next's you will land to "Instance Configuration" page. Now here you have to Enter the "SQL Server Network Name" and the "Instance Name" (For named instance)

For Eg. If you enter here the Network Name  as "SQLServer_01" and Instance Name as "SQL01". Then the Server Name in the connectivity will be "SQLServer_01\SQL01".


3. Again after few Next's you will land to "Cluster Resource Group" page, were you have to enter a Unique name as a Cluster Resource Group Name. This will help in case there are multiple Cluster configuration.


4. Here we have to check all the Disks which you want to bring under that Cluster Group.


5. Enter an "Unique IP address" in the Address box after un-checking the DHCP.


6. So by now your SQL Server Cluster is installed on the Active Node. Now, you have to start Adding node on the Passive instance. As you can see the snapshot you have to start the installation and Click "Installation" link on left hand side of the page. But this time choosing "Add node to a SQL Server Failover Cluster".


Rest of the process are simple. So now the SQL Server Cluster is ready to deploy your Database.

Click here to refer Part 1 and Part 2 of this topic.

We will discuss the Errors while configuring the SQL Server Clustering in different post. So stay tuned.

Till then Keep Learning and Enjoy Learning!!!

Monday, September 7, 2015

SQL Server 2012 Clustering - Part 2

Dear Friends,

As you have seen how to configure Windows Clustering, now let's proceed to the next step of SQL Server 2012 Clustering which is Configuration of Quorum.

For configuration of Quorum following are the two approaches:

Method 1: Failover Cluster Manager GUI

Method 2: Windows Power Shell

Let's have a look how to configure Quorum by these two method:

Method 1: Through Failover Cluster Manager GUI

Below are the snapshot with description for the configuration of Quorum:

1. Open the FOCM (Failover Cluster Manager). Towards the extreme right you can see "More Actions" Click that then click "Configure Cluster Quorum Settings...". You can see these steps in the below snapshot.


2. Once you are in the page of cluster configuration you can refer the below snapshot in clockwise direction.

i. Check the radio button "Select the Quorum Witness".
ii. Next check "Configure a file share witness".
iii. Pass the location (path name), here it will create the binary for Quorum.
iv. Click next and check all the settings which you have configured.


3. Click Finish and view the report. You have successfully configured the Quorum.


Method 2: Through Windows Power Shell

Configuring Quorum through Windows Power Shell is simple. The only thing we need to run is a one liner command as you can see in the below snapshot.


  • Open Windows Power Shell from the Task bar or open run and type "powershell".
  • Run the below command:
  • Set-ClusterQuorum -NodeAndFileShareMajority \\abc\sqlserver\

Till now we have seen how to Configure Windows Cluster and Configuration of Quorum. So both these are the pre requisite for configuration of SQL Server Cluster as well as SQL Server AlwaysON. In the Part 3 of the post we will see how to configure SQL Server Cluster.

Refer to the link of msdn here for more knowledge on Quorum setting.

Click here to refer Part 1 and Part 3 of this topic.

Thank you guys for reading the post, click here to read my first post on this blog. Do comment on the post.

Keep Learning and Happy Learning!!!

Wednesday, August 12, 2015

SQL Server 2012 Clustering - Part 1

Dear Friends,

Recently I've configured Clustering as a Disaster Recovery (DR) and High Availability (HA) solution for one of my project. You might find many blogs on this topic explaining the concept and how to configure SQL Clustering.

Here I will try to explain the same in my terms and keep it as much as simple. And yes it will be from starch i.e. We will first see the how to configure Windows Cluster and then on top of it will configure SQL Server Clustering. It will be a multi part series.

Brief on Clustering:  

Cluster can be defined as when two independent machine come into existence with each other by sharing the disks in common. This is done because, just in case of any disaster on physical machine, it will automatically failover the disks to another machine as the disks are shared between the Servers. This will recover the Database in disaster. So this solution can be used as Disaster Recovery (DR) solution along with High Availability (HA).

I. Step for configuration of Windows Clustering Using GUI:

1. To start with the Windows Clustering; it is mandatory to have the Shared Storage between the Servers (which should be setup by the SAN Administrator).
To verify these disks open Server Manager and verify if the Shared Disks are visible on both the Servers like you can see in the below snapshot.

Server Manager GUI
Server Manager GUI


 2. Now we have to add "Failover Cluster" Roles on the Server. Open "Server Manager" then click "Add Roles And Feature".

Below snapshot means:

   i. Select Roles-based option.
   ii. Select the appropriate Server name.
   iii. Click Next
   iv. Check "Failover Cluster"
    v. Click "Add Feature" then click install


3. Once the roles is added, go to Service manager and then, Tools and then, Failover Cluster Manager. Open Failover Cluster Manager GUI.


4. As shown in the below snapshot, Go to extreme Right and click Validate Configuration.


5. Validate Configuration step will basically check Storage, Network, etc. One need to check the recommended setting and validate the configuration.
The Disk will go offline and come back online; if Disk Validation is checked. (Disk validation is basically unchecked when the Cluster is in production.)

Below snapshot means:

   i. Enter the both the Server Names.
   ii. Run the recommended setting.
   iii. You can view the progress
   iv. View the error if any or click finish.


6. Once it is successfully validated, you need to mention a Windows Cluster Name and an IP Address for that Windows Cluster as you can see in the below snapshot. Once you have successfully completed click Finish.


You can cross verify by cmd command and ping the Windows Cluster name or the IP Address provided above in point 5.

II. Step for configuration of Windows Clustering Using Power Shell:

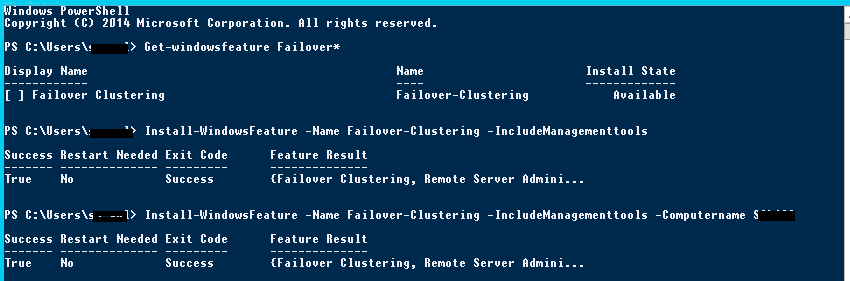
1. We need to first install the Cluster Failover Management Tools:

Following commands can be run from the Power Shell:

a. Get-WindowsFeature Failover*

b. Install-WindowsFeature -Name Failover-Clustering -IncludeManagementTools --This command will install the Windows Feature Failover tools on the local Server but if you want to install the same on remote Server as well we have to run the following command:

c. Install-WindowsFeature -Name Failover-Clustering -IncludeManagementTools -ComputerName XYZ


2. Till now you have installed Failover feature on the Servers, next you have to configure Windows Cluster on these Servers:

Following commands can be run from the Power Shell:

d. New-Cluster -name SQL_Cluster -Node ABC, XYZ -StaticAddress xxx.xx.xx.xxx


where SQL_Cluster is Windows Cluster Name
ABC and XYZ are the Server Names between which Cluster needs to be installed
xxx.xx.xx.xxx  is the static IP Address for Windows Cluster.

So you have seen how simple is to build Windows Clustering through GUI as well as Poser Shell. This is not just limited as a pre- requisite to SQL Server Clustering but also for Configuring AlwaysON.

Here's the end of Part 1 of SQL Server 2012 Clustering. We have seen how to configure the Windows Server Clustering which is the first step towards configuring SQL Server Clustering.

Now next will be configuring the Quorum for the Cluster.

Click here to refer Part 2 and Part 3 of this topic.

Thank you for reading this post. So stay tuned and share your comments too.

Keep Learning and Happy Learning!!!