Monday, September 14, 2015

SQL Server 2012 Clustering - Part 3

Hi Guys,

As we have seen my previous posts on how to configure the Windows Clustering and Setup the Quorum, now we will move forwards towards the final step to configure the SQL Server Cluster.

Installing and Configuring SQL Server Cluster is very much similar to installing a SQL Stand alone Server. Here, we will install and configure a two node Active - Passive Cluster and will see only the different pages occur while Installing and Configuring the SQL Server Clustering rest pages remains the same.

Let's start with the installation of SQL Server Cluster on Active Server. Following are snapshots for it:

1. Start the installation and Click "Installation" link on left hand side of the page. And then start the installation with "New SQL Server Failover Cluster Installation".


2. After couple of Next and Next's you will land to "Instance Configuration" page. Now here you have to Enter the "SQL Server Network Name" and the "Instance Name" (For named instance)

For Eg. If you enter here the Network Name  as "SQLServer_01" and Instance Name as "SQL01". Then the Server Name in the connectivity will be "SQLServer_01\SQL01".


3. Again after few Next's you will land to "Cluster Resource Group" page, were you have to enter a Unique name as a Cluster Resource Group Name. This will help in case there are multiple Cluster configuration.


4. Here we have to check all the Disks which you want to bring under that Cluster Group.


5. Enter an "Unique IP address" in the Address box after un-checking the DHCP.


6. So by now your SQL Server Cluster is installed on the Active Node. Now, you have to start Adding node on the Passive instance. As you can see the snapshot you have to start the installation and Click "Installation" link on left hand side of the page. But this time choosing "Add node to a SQL Server Failover Cluster".


Rest of the process are simple. So now the SQL Server Cluster is ready to deploy your Database.

Click here to refer Part 1 and Part 2 of this topic.

We will discuss the Errors while configuring the SQL Server Clustering in different post. So stay tuned.

Till then Keep Learning and Enjoy Learning!!!

Tuesday, September 8, 2015

Error 1807 - Database creation failed


Hi Friends,

While creating a Database an Error 1807 occurred as you can see the following snapshot.

Basically the create database failed due to an exclusive lock cannot be obtained on "Model" Database. 

Error 1807 - Database creation failed
Error 1807 - Database Creation Failed

Run the below set of queries to find out were exactly is Model Database is on use:

Use master
  GO
  IF EXISTS(SELECT request_session_id  FROM sys.dm_tran_locks
  WHERE resource_database_id = DB_ID('Model'))
   PRINT 'Model Database being used by some other session'
  ELSE
   PRINT 'Model Database not used by other session'


  SELECT request_session_id  FROM sys.dm_tran_locks
  WHERE resource_database_id = DB_ID('Model')


DBCC InputBuffer(52)

Kill the SPID and re-run the create database syntax. This time you will create a Database without any error.

Check out the error here while executing the Extended Stored Procedure.

Keep Learning and Enjoy Learning!!!

SQL Edition Upgrade Architecture Mismatch

Hi Friends,

I have recently posted an article on how to configure Quorum which was Part 2 post of three part series of SQL Server Clustering.

Recently I was checking my old mails and from that I found an error which we have faced a year back. So though of sharing with you guys. As my headline states "SQL Edition Upgrade Architecture Mismatch", yes it some what belongs to Edition Upgradation error.

Following is the snapshot of the error:

SQL Edition Upgrade Architecture Mismatch
Error - SQL Edition Upgrade Architecture Mismatch
Generally we do get this error on the landing page itself during the verification step if SQL Server found there is mismatch in the Bits i.e. x86 or x64 Bit. So the solution for this is very much simple.

Go to the Option tab on the left hand side in the initial page. Now you can see there are two radio buttons x86 and x64. By default its x64. You can change this as per your requirement.

You can see the following snapshot for reference:


After changing it you can proceed with the installation part.

If anyone of you planning for SQL Server Certification refer this post, it will give you an overview on the examination. Also you can comment on it if you have any.

Keep Learning and Enjoy Learning!!!

Monday, September 7, 2015

SQL Server 2012 Clustering - Part 2

Dear Friends,

As you have seen how to configure Windows Clustering, now let's proceed to the next step of SQL Server 2012 Clustering which is Configuration of Quorum.

For configuration of Quorum following are the two approaches:

Method 1: Failover Cluster Manager GUI

Method 2: Windows Power Shell

Let's have a look how to configure Quorum by these two method:

Method 1: Through Failover Cluster Manager GUI

Below are the snapshot with description for the configuration of Quorum:

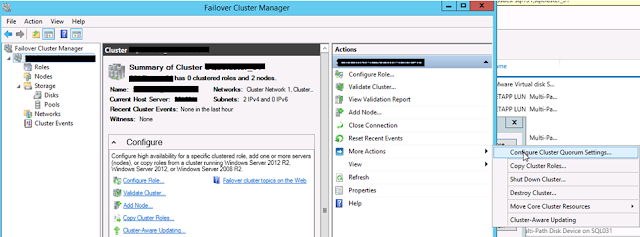
1. Open the FOCM (Failover Cluster Manager). Towards the extreme right you can see "More Actions" Click that then click "Configure Cluster Quorum Settings...". You can see these steps in the below snapshot.


2. Once you are in the page of cluster configuration you can refer the below snapshot in clockwise direction.

i. Check the radio button "Select the Quorum Witness".
ii. Next check "Configure a file share witness".
iii. Pass the location (path name), here it will create the binary for Quorum.
iv. Click next and check all the settings which you have configured.


3. Click Finish and view the report. You have successfully configured the Quorum.


Method 2: Through Windows Power Shell

Configuring Quorum through Windows Power Shell is simple. The only thing we need to run is a one liner command as you can see in the below snapshot.


  • Open Windows Power Shell from the Task bar or open run and type "powershell".
  • Run the below command:
  • Set-ClusterQuorum -NodeAndFileShareMajority \\abc\sqlserver\

Till now we have seen how to Configure Windows Cluster and Configuration of Quorum. So both these are the pre requisite for configuration of SQL Server Cluster as well as SQL Server AlwaysON. In the Part 3 of the post we will see how to configure SQL Server Cluster.

Refer to the link of msdn here for more knowledge on Quorum setting.

Click here to refer Part 1 and Part 3 of this topic.

Thank you guys for reading the post, click here to read my first post on this blog. Do comment on the post.

Keep Learning and Happy Learning!!!

Friday, September 4, 2015

Dropping a SQL Server Database

Hi Guys,

Last post I have shared an Error that I was unable to start my SQL Server Database Engine. Today here I will share a small finding which I thought of worth sharing it.

In one of my migration project what I observed was "Even after dropping a Database the Data files and Log files were still exist". Ideally this should not happen because if we drop a Database the data file and log file associated with it should be dropped as well. But lets see what happened exactly that the database files are not dropped.

So what are the reasons for this?

Following are various ways to remove or Offline the Database from the SQL Server Database Engine:

a. Drop a Database
b. Detach \ Attach
c. Offline \ Online

General syntax for dropping a Database is: Drop Database Test

Let's see the scenario what exactly happened:

For the production migration what we were suppose to do was, remove then Test migrated Database and the replace it with the new Production migration Database. Following is the sequence which I followed:

Current Production Server : SQLServer-Current
New Production Server : SQLServer-New
Database Name : Test
  1. The test migration for the Database "Test" was done on "SQLServer-New" from "SQLServer-Current" Server.
  2. After proper testing on "SQLServer-New" the Databases was put Offline.
  3. On the day of actual Production Migration, we dropped the database so that we can create a fresh copy of the Database.
  4. Once it was dropped we started restoring the Database on the location were we have kept the data and log file.
  5. It popped out an error message that the mdf and ldf files are exist. Either I should rename by new file name or I need to change  the path.
  6. Since I cannot change the Database path, I was forced to change the file names.
  7. After that I was able to restore the Database.
  8. But I was wondering how can the files are still exist if I have dropped the Database. So once the migration activity was completed successfully I started troubleshooting it and here I found something new to learn.
"If you put the Database in Offline state and then drop a Database; you will always find the file associated with the Database present in the defined location"

Share you comments or any queries below to discuss more.